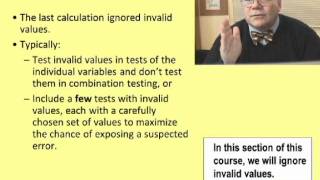
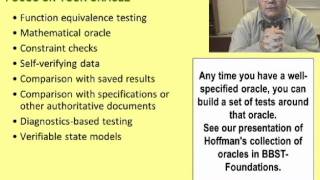
In Brief: In this lecture, Kaner provides a structure for organizing your thinking about the many

Bbst Test Design 6b Combination Testing - General How People Use It

This search page groups Bbst Test Design 6b Combination Testing through meaning, examples, related intent, useful checks, and follow-up paths while keeping the content simple to scan and easy to expand.

In addition, this page also connects Bbst Test Design 6b Combination Testing with for broader topic coverage.

General How People Use It

This part keeps Bbst Test Design 6b Combination Testing connected to practical references instead of leaving it as a single isolated phrase.

Overview Checklist

The key details usually include definitions, examples, comparisons, requirements, limitations, and updated references.

Resource Main Overview

A clean overview helps readers understand Bbst Test Design 6b Combination Testing before moving into details, examples, or connected topics.

Reference Quick Tips

For changing topics, check updated sources and avoid depending on one short snippet alone.

Useful notes from the results

  • In this lecture, Kaner provides a structure for organizing your thinking about the many

Why this overview helps

This topic hub helps readers find a fast starting point for Bbst Test Design 6b Combination Testing so they can continue with better search intent.

Sponsored

Quick FAQ

What details can change around Bbst Test Design 6b Combination Testing?

Dates, prices, policies, availability, providers, software versions, and public details may change over time.

What supporting details help explain Bbst Test Design 6b Combination Testing?

Comparison helps readers avoid narrow results and find the angle that best matches their intent.

How should readers use this page?

Use this page as a starting point, then open related entries or official sources when exact details matter.

What makes Bbst Test Design 6b Combination Testing easier to understand?

Clear headings, short explanations, practical notes, and related entries make Bbst Test Design 6b Combination Testing easier to scan and compare.

Related Picture Notes

BBST Test Design 6B: Combination Testing
BBST Test Design 6A: Combination Testing
BBST Test Design 6D: Combination Testing
BBST Test Design 6C: Combination Testing
BBST Test Design 1D: Function Testing, Tours, & A Taxonomy of Techniques
BBST Test Design 4B: Scenarios and Use Cases: Comparatively Evaluating Test Techniques
BBST Test Design 2D: Risk-Based Testing, Testing Strategy, and the Heuristic Test Strategy Model
BBST Test Design 2B: Risk-Based Testing, Testing Strategy, and the Heuristic Test Strategy Model
BBST Test Design 2C: Risk-Based Testing, Testing Strategy, and the Heuristic Test Strategy Model
BBST Test Design 1F: Function Testing, Tours, & A Taxonomy of Techniques
Sponsored
Open Topic Snapshot
BBST Test Design 6B: Combination Testing

BBST Test Design 6B: Combination Testing

Read more details and related context about BBST Test Design 6B: Combination Testing.

BBST Test Design 6A: Combination Testing

BBST Test Design 6A: Combination Testing

Read more details and related context about BBST Test Design 6A: Combination Testing.

BBST Test Design 6D: Combination Testing

BBST Test Design 6D: Combination Testing

Read more details and related context about BBST Test Design 6D: Combination Testing.

BBST Test Design 6C: Combination Testing

BBST Test Design 6C: Combination Testing

Read more details and related context about BBST Test Design 6C: Combination Testing.

BBST Test Design 1D: Function Testing, Tours, & A Taxonomy of Techniques

BBST Test Design 1D: Function Testing, Tours, & A Taxonomy of Techniques

In this lecture, Kaner provides a structure for organizing your thinking about the many

BBST Test Design 4B: Scenarios and Use Cases: Comparatively Evaluating Test Techniques

BBST Test Design 4B: Scenarios and Use Cases: Comparatively Evaluating Test Techniques

Read more details and related context about BBST Test Design 4B: Scenarios and Use Cases: Comparatively Evaluating Test Techniques.

BBST Test Design 2D: Risk-Based Testing, Testing Strategy, and the Heuristic Test Strategy Model

BBST Test Design 2D: Risk-Based Testing, Testing Strategy, and the Heuristic Test Strategy Model

Read more details and related context about BBST Test Design 2D: Risk-Based Testing, Testing Strategy, and the Heuristic Test Strategy Model.

BBST Test Design 2B: Risk-Based Testing, Testing Strategy, and the Heuristic Test Strategy Model

BBST Test Design 2B: Risk-Based Testing, Testing Strategy, and the Heuristic Test Strategy Model

Read more details and related context about BBST Test Design 2B: Risk-Based Testing, Testing Strategy, and the Heuristic Test Strategy Model.

BBST Test Design 2C: Risk-Based Testing, Testing Strategy, and the Heuristic Test Strategy Model

BBST Test Design 2C: Risk-Based Testing, Testing Strategy, and the Heuristic Test Strategy Model

Read more details and related context about BBST Test Design 2C: Risk-Based Testing, Testing Strategy, and the Heuristic Test Strategy Model.

BBST Test Design 1F: Function Testing, Tours, & A Taxonomy of Techniques

BBST Test Design 1F: Function Testing, Tours, & A Taxonomy of Techniques

In this lecture, Kaner provides a structure for organizing your thinking about the many