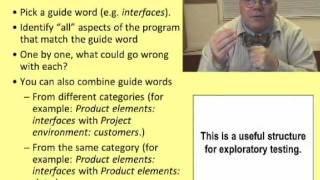
Helpful Context: In this lecture, Kaner provides a structure for organizing your thinking about the many

Bbst Test Design 6a Combination Testing - Guide Reference Guide

This context guide compares Bbst Test Design 6a Combination Testing through key notes, similar searches, practical details, and next-step resources with enough variation for broader AGC-style topic coverage.

In addition, this page also connects Bbst Test Design 6a Combination Testing with for broader topic coverage.

Guide Reference Guide

Bbst Test Design 6a Combination Testing can be reviewed through a clear overview first, then compared with related entries and supporting context.

Guide Reader Context

The surrounding context helps explain why people search for Bbst Test Design 6a Combination Testing and what they usually want to check next.

Context Useful Information

This section highlights the practical pieces readers may want before opening a more specific related page.

Context Helpful Reminders

Before relying on any single result, compare related pages and verify important facts from stronger sources.

Main details to review

  • In this lecture, Kaner provides a structure for organizing your thinking about the many

Why this overview helps

This page is useful when readers need clear context before opening more detailed pages.

Sponsored

Reader Questions

How does Bbst Test Design 6a Combination Testing connect to reference?

Bbst Test Design 6a Combination Testing can connect to reference when readers need context, examples, comparisons, or practical next steps inside the same topic area.

How does Bbst Test Design 6a Combination Testing connect to resource?

Bbst Test Design 6a Combination Testing can connect to resource when readers need context, examples, comparisons, or practical next steps inside the same topic area.

What should be avoided when researching Bbst Test Design 6a Combination Testing?

Avoid treating one short snippet as complete, especially when the topic involves money, health, law, schedules, or current details.

Topic Images

BBST Test Design 6A: Combination Testing
BBST Test Design 6B: Combination Testing
BBST Test Design 6D: Combination Testing
BBST Test Design 6C: Combination Testing
BBST Test Design 1D: Function Testing, Tours, & A Taxonomy of Techniques
BBST Test Design 2A: Risk-Based Testing, Testing Strategy, and the Heuristic Test Strategy Model
BBST Test Design 1F: Function Testing, Tours, & A Taxonomy of Techniques
BBST Test Design 2C: Risk-Based Testing, Testing Strategy, and the Heuristic Test Strategy Model
BBST Test Design 3A: Specification-Based Testing
BBST Test Design 2D: Risk-Based Testing, Testing Strategy, and the Heuristic Test Strategy Model
Sponsored
Check Main Points
BBST Test Design 6A: Combination Testing

BBST Test Design 6A: Combination Testing

Read more details and related context about BBST Test Design 6A: Combination Testing.

BBST Test Design 6B: Combination Testing

BBST Test Design 6B: Combination Testing

Read more details and related context about BBST Test Design 6B: Combination Testing.

BBST Test Design 6D: Combination Testing

BBST Test Design 6D: Combination Testing

Read more details and related context about BBST Test Design 6D: Combination Testing.

BBST Test Design 6C: Combination Testing

BBST Test Design 6C: Combination Testing

Read more details and related context about BBST Test Design 6C: Combination Testing.

BBST Test Design 1D: Function Testing, Tours, & A Taxonomy of Techniques

BBST Test Design 1D: Function Testing, Tours, & A Taxonomy of Techniques

In this lecture, Kaner provides a structure for organizing your thinking about the many

BBST Test Design 2A: Risk-Based Testing, Testing Strategy, and the Heuristic Test Strategy Model

BBST Test Design 2A: Risk-Based Testing, Testing Strategy, and the Heuristic Test Strategy Model

Read more details and related context about BBST Test Design 2A: Risk-Based Testing, Testing Strategy, and the Heuristic Test Strategy Model.

BBST Test Design 1F: Function Testing, Tours, & A Taxonomy of Techniques

BBST Test Design 1F: Function Testing, Tours, & A Taxonomy of Techniques

In this lecture, Kaner provides a structure for organizing your thinking about the many

BBST Test Design 2C: Risk-Based Testing, Testing Strategy, and the Heuristic Test Strategy Model

BBST Test Design 2C: Risk-Based Testing, Testing Strategy, and the Heuristic Test Strategy Model

Read more details and related context about BBST Test Design 2C: Risk-Based Testing, Testing Strategy, and the Heuristic Test Strategy Model.

BBST Test Design 3A: Specification-Based Testing

BBST Test Design 3A: Specification-Based Testing

Read more details and related context about BBST Test Design 3A: Specification-Based Testing.

BBST Test Design 2D: Risk-Based Testing, Testing Strategy, and the Heuristic Test Strategy Model

BBST Test Design 2D: Risk-Based Testing, Testing Strategy, and the Heuristic Test Strategy Model

Read more details and related context about BBST Test Design 2D: Risk-Based Testing, Testing Strategy, and the Heuristic Test Strategy Model.