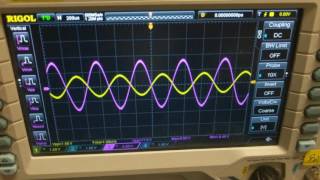
Useful Context: Measuring maximum signal swing on the bypassed common collector amplifier.
Bjt Lab Part 4 - Overview Specific Notes
This expanded guide maps Bjt Lab Part 4 through quick context, useful references, alternate wording, and broader search ideas so readers can continue into related pages with clearer context.
In addition, this page also connects Bjt Lab Part 4 with for broader topic coverage.
Overview Specific Notes
This section highlights the practical pieces readers may want before opening a more specific related page.
Reference Follow-Up Tips
Before relying on any single result, compare related pages and verify important facts from stronger sources.
Resource Information Guide
A clean overview helps readers understand Bjt Lab Part 4 before moving into details, examples, or connected topics.
Guide Context
This part keeps Bjt Lab Part 4 connected to practical references instead of leaving it as a single isolated phrase.
Useful notes from the results
- Measuring maximum signal swing on the bypassed common collector amplifier.
Why this overview helps
The main value is that it gives readers a simple way to compare connected search results.
Quick FAQ
What related areas connect to Bjt Lab Part 4?
Related areas may include comparisons, examples, requirements, common mistakes, updated references, and practical follow-up guides.
How does Bjt Lab Part 4 connect to guide?
Bjt Lab Part 4 can connect to guide when readers need context, examples, comparisons, or practical next steps inside the same topic area.
Why might Bjt Lab Part 4 have several meanings?
Different pages may focus on different locations, dates, providers, versions, definitions, or user needs.
How can related pages improve understanding of Bjt Lab Part 4?
Related pages add context, alternative wording, practical examples, and follow-up paths for deeper research.